Milling Insert Selection Guide for Better Cutting Performance
Author : Surya makeyoueasy | Published On : 20 Aug 2026
 Introduction
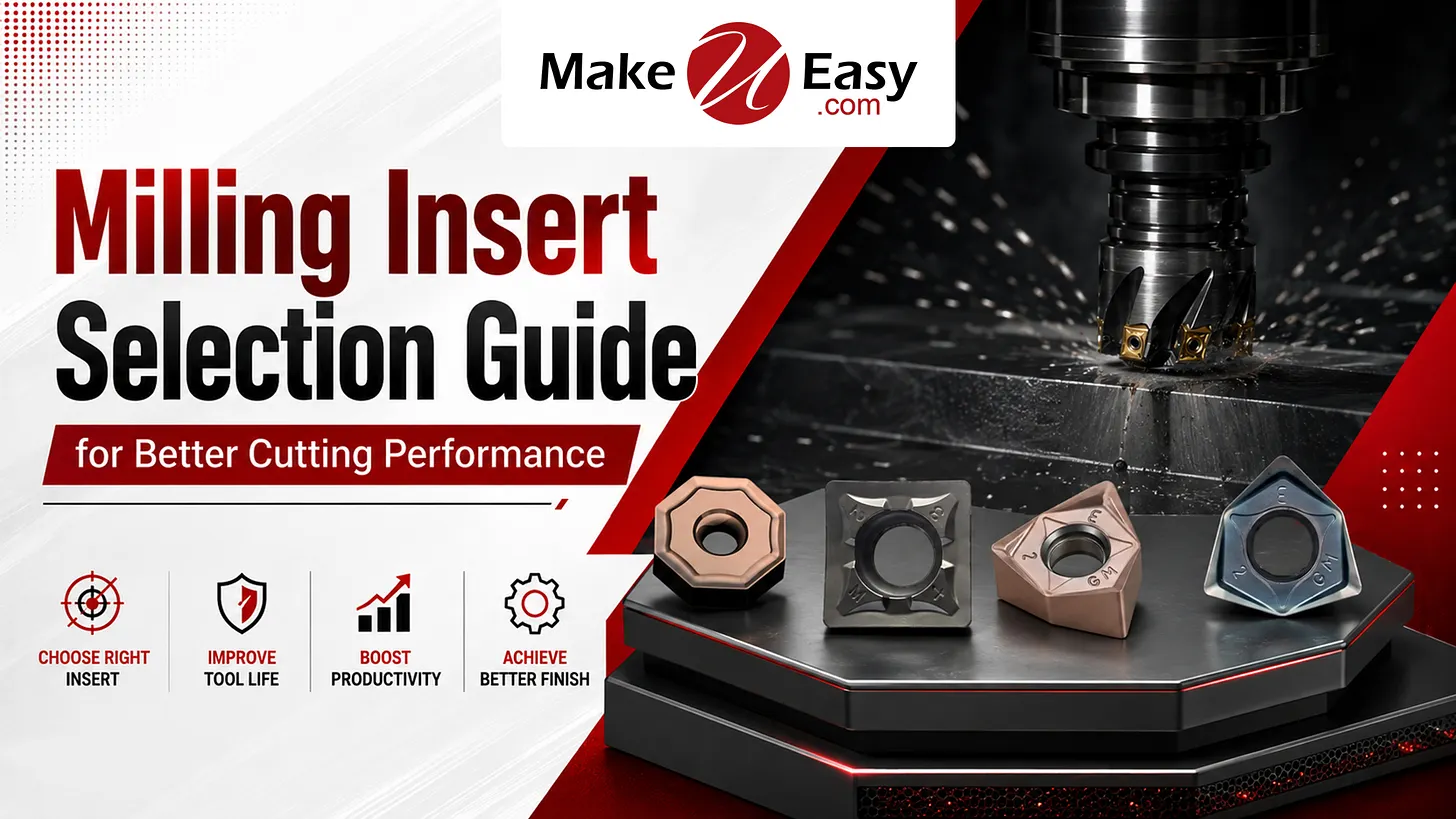
Choosing the right milling insert is essential for achieving better cutting performance, longer tool life, and consistent surface finish in CNC machining. The best insert depends on the workpiece material, milling operation, insert grade, geometry, coating, and cutting conditions. Proper milling insert selection can reduce tool wear, improve chip control, minimize vibration, and increase overall machining productivity.
What Is a Milling Insert?
A milling insert is a replaceable cutting component mounted on an indexable milling cutter. Instead of replacing the complete cutter when the cutting edge becomes worn, the insert can be indexed to another usable edge or replaced.
Milling inserts are commonly used for:
-
Face milling
-
Shoulder milling
-
High-feed milling
-
Slot milling
-
Profile milling
-
Roughing
-
Semi-finishing
-
Finishing
Different insert shapes and grades are available to meet specific CNC milling requirements.
Why Milling Insert Selection Matters
The wrong insert can lead to poor surface quality, excessive vibration, premature wear, or reduced productivity.
Choosing the correct milling insert can help achieve:
-
Longer tool life
-
Better surface finish
-
Higher material removal rates
-
Improved dimensional accuracy
-
Better chip evacuation
-
Reduced cutting forces
-
Lower tooling costs
-
Consistent machining performance
How to Choose the Right Milling Insert
1. Start with the Workpiece Material
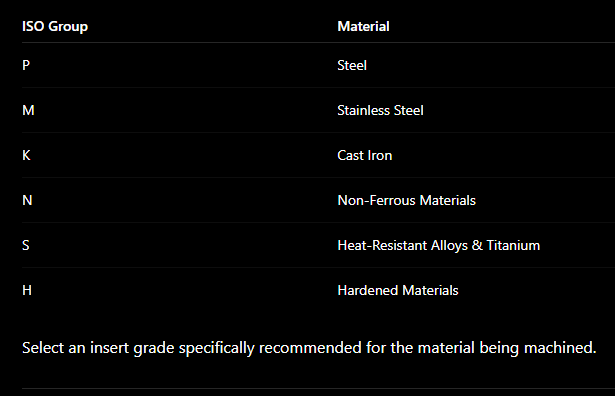
The workpiece material is one of the most important factors in milling insert selection.
Common ISO material groups include:
2. Match the Insert to the Milling Operation
Different operations place different demands on the cutting edge.
Face Milling: Choose inserts designed for efficient machining of broad, flat surfaces.
Shoulder Milling: Select geometry capable of producing the required shoulder and wall accuracy.
High-Feed Milling: Use inserts designed for shallow depths of cut and high feed rates.
Rough Milling: Prioritize strong cutting edges and toughness.
Finish Milling: Choose inserts with geometries designed to achieve better surface quality and dimensional control.
3. Choose the Correct Insert Grade
The geometry determines the balance between wear resistance and toughness.
Harder Grades
Better suited for:
-
Stable machining
-
Higher cutting speeds
-
Continuous cutting
-
Finishing operations
Tougher Grades
Better suited for:
-
Interrupted cuts
-
Unstable machining
-
Heavy roughing
-
Vibration-prone applications
The hardest insert is not automatically the best choice. The correct grade should match the actual machining conditions.
4. Consider Insert Geometry
Insert geometry affects cutting forces, chip formation, edge strength, and surface finish.
Positive Geometry
Positive inserts generally provide:
-
Lower cutting forces
-
Smooth cutting action
-
Reduced power consumption
They can be useful for less rigid machines and finishing applications.
Stronger Geometry
A stronger cutting edge can be beneficial for:
-
Heavy roughing
-
Interrupted cuts
-
Tough machining conditions
-
Higher cutting loads
Choose geometry based on the balance between sharpness and edge strength required by the application.
5. Select the Right Insert Coating
Coatings can improve heat resistance, wear resistance, and overall insert life.
Common coating technologies include:
-
TiN
-
TiCN
-
TiAlN
-
AlTiN
-
CVD coatings
-
PVD coatings
The ideal coating depends on the workpiece material, cutting speed, temperature, and machining conditions.
6. Check Insert Shape and Size
Milling inserts are available in several shapes, including
-
Square
-
Round
-
Triangular
-
Rhombic
-
Rectangular
-
Specialized high-feed geometries
Insert size should also match the cutter body and the required depth of cut.
Always verify the exact insert designation and cutter compatibility before purchasing.
7. Consider Cutting Conditions
Before selecting a milling insert, evaluate:
-
Cutting speed
-
Feed per tooth
-
Depth of cut
-
Width of cut
-
Coolant conditions
-
Machine power
-
Workpiece stability
The insert must be capable of handling the intended machining parameters without excessive wear or edge failure.
8. Check Machine and Setup Rigidity
Even a premium milling insert may perform poorly in an unstable setup.
For better results:
-
Minimize tool overhang.
-
Use a rigid tool holder.
-
Clamp the workpiece securely.
-
Check cutter runout.
-
Keep insert pockets clean.
-
Ensure inserts are correctly seated.
Reducing vibration can significantly improve insert life and surface quality.
Milling Inserts for Different Materials
Milling Inserts for Steel
Look for a suitable P-grade insert with a balance of wear resistance and toughness for the required operation.
Milling Inserts for Stainless Steel
Stainless steel often requires sharp geometry and a suitable grade that can handle heat and work-hardening tendencies.
Milling Inserts for Cast Iron
Cast iron machining generally benefits from wear-resistant K-grade inserts with strong cutting edges.
Milling Inserts for Aluminum
Sharp, polished cutting edges and geometries designed for non-ferrous materials can help prevent built-up edges and improve surface finish.
Common Milling Insert Problems
Rapid Insert Wear
Check cutting speed, insert grade, coating, and workpiece material compatibility.
Insert Chipping
Review machine stability, feed rate, cutting depth, insert toughness, and interrupted cutting conditions.
Poor Surface Finish
Inspect insert wear, cutter runout, feed rate, vibration, and cutting-edge condition.
Built-Up Edge
Adjust cutting conditions and ensure the insert geometry and grade are suitable for the workpiece material.
Tips for Longer Milling Insert Life
For better cutting performance:
-
Match the insert grade to the workpiece.
-
Use recommended cutting parameters.
-
Select the correct geometry.
-
Maintain a rigid machining setup.
-
Check insert pockets regularly.
-
Avoid excessive tool overhang.
-
Monitor cutting-edge wear.
-
Index or replace inserts at the correct time.
A balanced setup often delivers better results than simply increasing cutting speed or choosing the hardest insert available.
Why Choose MakeYouEasy?
At MakeYouEasy, we provide CNC cutting tools and machining accessories for industrial manufacturing applications.
Our product range includes:
-
Milling Inserts
-
Face Milling Cutters
-
High-Feed Milling Cutters
-
Turning Inserts
-
Grooving Inserts
-
Threading Inserts
-
U Drills
-
Thread Milling Cutters
-
BT Tool Holders
-
Precision Measuring Instruments
Explore CNC cutting tools: MakeYouEasy
Conclusion
Choosing the right milling insert for CNC machining requires careful consideration of the workpiece material, milling operation, insert grade, geometry, coating, cutting parameters, and machine stability. A properly selected insert can improve surface finish, increase material removal rates, extend tool life, and reduce overall machining costs.
For better cutting performance, avoid selecting inserts based on price or hardness alone. Instead, match the insert, cutter, material, and machining conditions as one complete cutting system.
Frequently Asked Questions
1. How do I choose the right milling insert?
Choose the insert based on workpiece material, milling operation, grade, geometry, coating, and cutting conditions.
2. Which milling insert is best for steel?
A suitable ISO P-grade milling insert is generally recommended for steel, depending on the specific operation and cutting conditions.
3. Which milling insert is suitable for stainless steel?
A suitable ISO M-grade insert with appropriate geometry and wear resistance is commonly used for stainless steel milling.
4. How can I increase milling insert tool life?
Use the correct grade, geometry, cutting parameters, and rigid setup, and replace or index inserts before excessive wear develops.
5. Why do milling inserts chip during machining?
Insert chipping can result from excessive cutting loads, vibration, interrupted cuts, unsuitable grades, or unstable machining conditions.
