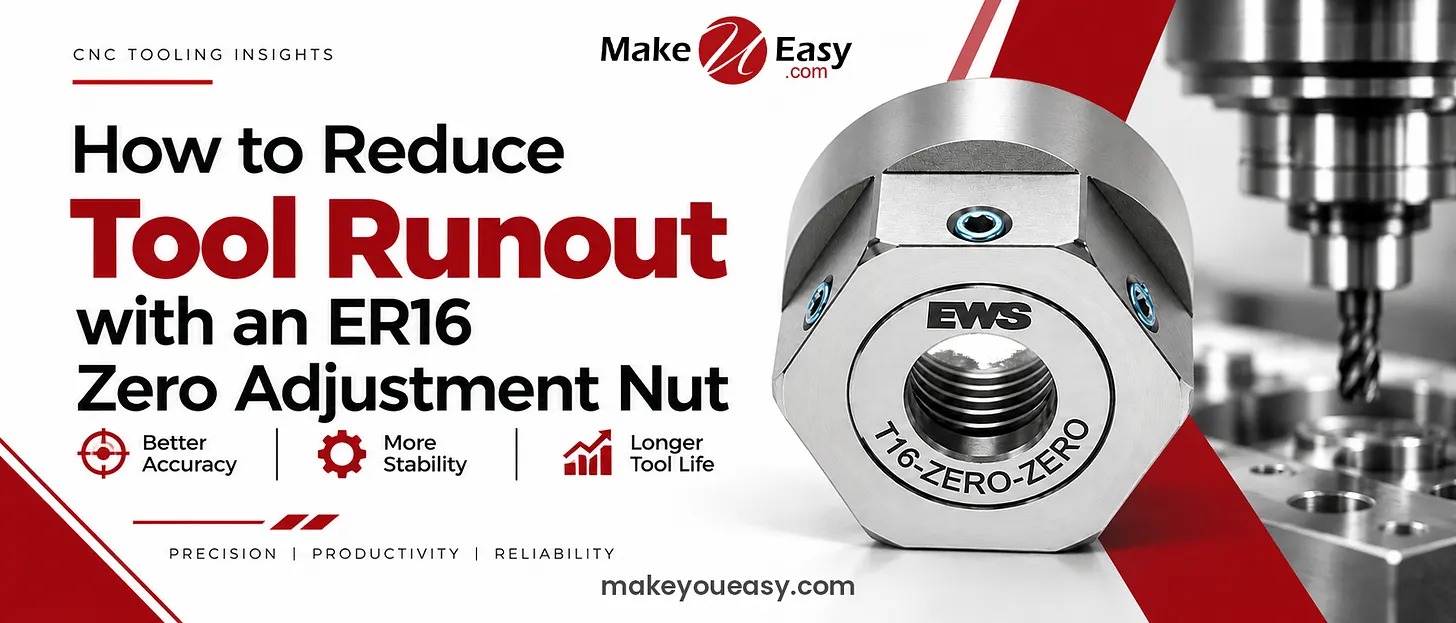
How to Reduce Tool Runout with an ER16 Zero Adjustment Nut
Author : Surya makeyoueasy | Published On : 17 Sep 2026
Introduction
Tool runout can reduce machining accuracy even when a high-quality cutter and CNC machine are being used. Small concentricity errors can cause one cutting edge to remove more material than the others, leading to uneven wear, vibration, dimensional variation, and poor surface finish. An ER16 zero adjustment nut, also called a runout compensation nut, provides a way to make fine radial corrections after the tool is clamped. When properly adjusted with a dial indicator, this type of nut can significantly reduce Total Indicator Runout (TIR) and improve the performance of drills, reamers, end mills, and other round-shank cutting tools.
What Is Tool Runout?
Tool runout occurs when the cutting tool does not rotate perfectly around the spindle centerline.
Instead of every cutting edge following the same circular path, one side of the tool rotates farther away from the true center.
Runout can originate from several areas:
-
Machine spindle
-
Toolholder taper
-
ER collet chuck
-
ER16 collet
-
Clamping nut
-
Cutting-tool shank
-
Dirt or chips between mating surfaces
-
Incorrect collet installation
-
Worn or damaged components
The runout of the complete assembly is normally checked as Total Indicator Runout or TIR.
What Is an ER16 Zero Adjustment Nut?
A zero adjustment nut is a specialized replacement for a conventional ER collet nut.
Instead of relying only on the natural concentricity of the holder, collet, nut, and cutting tool, an adjustable nut includes fine radial adjustment screws that allow the operator to compensate for measured runout.
Commercial systems such as the easyZERO design use six perimeter adjustment screws and are available for ER16 through ER40 collet systems. The manufacturer describes the system as a replacement nut intended to correct tool misalignment and runout.
For an ER16 version, always verify that the nut is designed for the exact ER16 holder and collet system being used.
Why Reduce Tool Runout?
Low runout allows the cutting edges to share the machining load more evenly.
Excessive runout can cause:
-
Uneven flute loading
-
Premature edge wear
-
Chipping
-
Oversized holes
-
Poor roundness
-
Increased vibration
-
Poor surface finish
-
Reduced tool life
Runout-compensation systems are specifically promoted for distributing chip load more evenly across cutting edges, which can contribute to more consistent wear and better machining results.
Standard ER16 Nut vs Zero Adjustment Nut
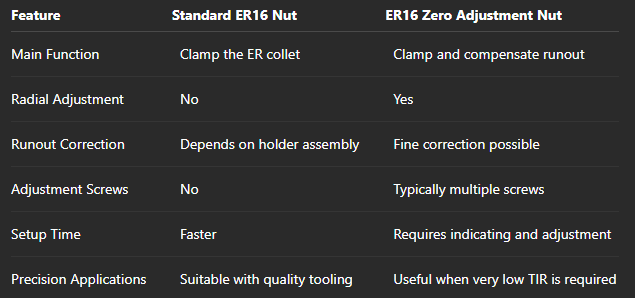
A zero adjustment nut should not be used as an excuse to ignore a damaged holder or poor-quality collet. It is a fine-correction device, not a magical repair kit wearing an ER16 costume.
1. Clean the Entire Toolholding System
Before attempting any adjustment, clean:
-
Spindle taper
-
Toolholder taper
-
ER16 holder
-
Collet taper
-
Collet slots
-
Adjustment nut
-
Cutting-tool shank
Even a small chip trapped between the collet and holder can shift the tool away from the spindle centerline.
The easyZERO setup instructions specifically begin by requiring all components to be thoroughly cleaned before adjustment.
2. Install the ER16 Collet Correctly
The collet should normally be snapped into the retaining feature of the nut before the nut is threaded onto the holder.
Incorrect assembly can prevent the collet from seating correctly and create unnecessary runout.
Once the collet is installed:
-
Thread the nut loosely onto the holder.
-
Insert the cutting-tool shank.
-
Position the tool at the required projection.
-
Tighten the ER16 assembly correctly.
For adjustable-nut systems, follow the manufacturer’s exact installation procedure.
3. Minimize Tool Projection
Runout becomes more noticeable as the measurement point moves farther from the holder.
A long tool projection also increases:
-
Deflection
-
Vibration
-
Bending load
-
Chatter risk
Clamp as much of the usable tool shank as practical while maintaining the required machining clearance.
This is especially important for:
-
Small end mills
-
Reamers
-
Long drills
-
Thread mills
-
Precision finishing tools
4. Measure the Initial Runout
After installing the tool, place the complete assembly in the machine spindle.
Use a suitable dial test indicator or high-resolution dial indicator.
The manufacturer of one runout-adjustable nut recommends using an indicator capable of 0.001 mm or 0.0001 inch resolution.
Position the indicator against:
-
A clean cylindrical tool shank, or
-
A dedicated concentricity band if the tool provides one
Rotate the spindle or holder manually through 360° and observe the maximum and minimum indicator readings.
The difference represents the measured TIR.
5. Find the Highest Runout Point
Slowly rotate the tool assembly while watching the indicator.
Mark or remember the point where the indicator reaches its highest reading.
This is the direction in which the tool is farthest from the desired rotational center.
On a set-screw-style zero adjustment nut, this reading identifies where radial correction should begin.
6. Adjust the ER16 Zero Nut
The exact procedure depends on the product design, so always follow its manufacturer’s instructions.
For the easyZERO-style system, the procedure uses multiple perimeter screws around the nut. After initially snugging the screws evenly, the tool is indicated and the screw nearest the highest measured point is tightened gradually. The opposite screw may be relieved slightly if additional movement is needed.
The basic process is:
-
Identify the highest indicator reading.
-
Make a very small adjustment.
-
Rotate the tool through 360° again.
-
Recheck TIR.
-
Find the new high point.
-
Make another fine correction.
-
Repeat until the required runout is achieved.
Small adjustments are important. The goal is controlled correction, not brute-force alignment.
7. Tighten the Remaining Adjustment Screws
Once acceptable TIR has been achieved, lightly secure the remaining adjustment screws according to the manufacturer’s procedure.
Then measure runout again.
This final check matters because tightening another screw can slightly change the tool position.
The easyZERO procedure similarly recommends securing the remaining perimeter screws and then verifying that the adjustment has not moved.
How Much Runout Can Be Corrected?
Correction capability depends on the specific nut.
For example, the current easyZERO product information states that its system can compensate for up to approximately 0.050 mm of runout, while its setup guide describes adjusting the assembly to below 0.005 mm TIR under its recommended procedure.
These figures should not automatically be applied to every ER16 zero adjustment nut.
Check the specifications of the exact product being used.
ER16 Zero Adjustment Nut Specifications
One documented ER16 runout-compensation system lists:
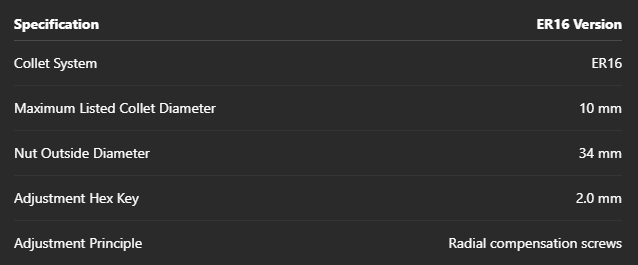
These specifications are specific to the referenced easyZERO ER16 design and should not be assumed for other manufacturers.
Applications That Benefit from Low Runout
Reaming
Reamers benefit greatly from concentric rotation because excessive runout can affect hole diameter, roundness, and surface finish.
Small-Diameter End Milling
Small cutters are sensitive to uneven flute loading. Lower runout distributes cutting forces more evenly.
Drilling
Reduced runout can help improve hole position, tool stability, and cutting-edge loading.
Thread Milling
Low runout helps maintain more consistent cutter engagement during helical interpolation.
Precision Finishing
Applications requiring tight dimensional tolerance and fine surface finish benefit from better tool concentricity.
How Lower Runout Improves Tool Life
Consider a multi-flute end mill.
If the tool has excessive runout, one flute may contact the workpiece more heavily than the others. Instead of sharing the programmed chip load equally, that flute becomes the unwilling employee doing everyone else’s shift.
It can wear or chip first.
Reducing runout helps distribute the cutting load more evenly between the flutes, supporting more consistent cutting-edge wear. This is one of the main benefits identified by manufacturers of runout-compensation nuts.
Common Runout Problems
Runout Remains High After Adjustment
Check the collet, holder, spindle taper, tool shank, and nut for contamination or damage.
Runout Changes After Tightening
The adjustment screws may have shifted the tool position. Repeat the indicator check after final tightening.
Good Runout Near the Holder but Poor Runout at the Tool Tip
The cutting tool may be bent, or the assembly may have angular misalignment.
Runout Returns After Tool Change
A zero adjustment is normally made for the complete installed tool assembly. Changing the cutter, collet, or holder can change the resulting TIR.
Tool Vibrates Even with Low Runout
Runout is only one factor. Check tool projection, workholding, spindle condition, tool geometry, speed, feed, and machine rigidity.
ER16 Runout Reduction Checklist
Before machining, verify:
-
Spindle taper is clean
-
Tool holder is clean
-
ER16 collet is undamaged
-
Collet is installed correctly
-
Tool shank is clean
-
Tool projection is minimized
-
Nut is tightened correctly
-
TIR is measured with a suitable indicator
-
Adjustment screws are corrected gradually
-
Final runout is checked after locking
-
Cutting parameters suit the tool and material
For precision machining, always measure the complete assembly, not just one component individually.
Why Choose MakeYouEasy?
At MakeYouEasy, you can explore CNC toolholding and machining accessories for different industrial applications.
Relevant product categories can include ER16 zero adjustment nuts, ER collets, ER tool holders, BT tool holders, cutting tools, boring tools, milling tools, and CNC accessories.
Before purchasing an ER16 zero adjustment nut, verify the ER size, holder thread and interface, adjustment mechanism, collet compatibility, maximum tool-shank capacity, and recommended setup procedure.
Conclusion
An ER16 zero adjustment nut can help reduce tool runout by allowing controlled radial correction of the cutting-tool position after it is clamped in the ER16 collet system. The adjustment is made by measuring the complete tool assembly with a dial indicator, identifying the high point, and gradually correcting the nut until the desired TIR is achieved.
For best results, combine the adjustment nut with a clean spindle and holder, a high-quality ER16 collet, a correctly installed cutting tool, minimum tool projection, accurate runout measurement, and a proper tightening procedure. Lower runout can improve cutting-edge load distribution, machining accuracy, surface finish, process stability, and tool life.
Frequently Asked Questions
1. What is an ER16 zero adjustment nut used for?
It is used to make fine radial corrections to reduce runout in compatible ER16 collet toolholding systems.
2. How do I measure tool runout?
Use a dial indicator against the tool shank and rotate the spindle or holder through 360° to measure Total Indicator Runout.
3. Can an ER16 zero adjustment nut eliminate all runout?
It can significantly reduce correctable runout, but the final result also depends on the spindle, holder, collet, cutting tool, cleanliness, and adjustment-nut design.
4. Does lower runout improve tool life?
Yes, lower runout can help distribute chip load more evenly across multiple cutting edges and reduce uneven wear.
5. Should I adjust the runout every time I change the cutting tool?
Runout should be rechecked after changing the tool, collet, holder, or setup because the concentricity of the complete assembly can change.
