Common U-Drill Problems and How to Solve Them
Author : Surya makeyoueasy | Published On : 05 Oct 2026
Introduction
U-drills, also known as indexable drills, are widely used for CNC hole making because they use replaceable carbide inserts and can provide productive drilling performance. However, problems such as insert breakage, poor chip evacuation, vibration, excessive wear, hole oversize, and overheating can affect tool life and hole quality. Identifying the actual cause and correcting the tooling, cutting data, coolant, or machine setup can help achieve more stable U-drilling performance.
1. U-Drill Insert Breakage
Insert breakage is one of the most serious U-drill problems because it can damage the workpiece, drill body, or machine.
Common causes:
-
Cutting speed or feed is too high
-
Excessive depth of cut
-
Incorrect insert grade or geometry
-
Tool runout
-
Unstable workholding
-
Interrupted cutting
-
Poor chip evacuation
-
Incorrect insert seating
How to solve it:
-
Verify cutting parameters against the manufacturer’s recommendations
-
Check that the insert is correctly seated and clamped
-
Inspect the drill body and insert pocket for damage
-
Minimise tool runout
-
Improve workpiece rigidity
-
Check chip evacuation before increasing cutting parameters
Optimize
Chip control is especially important in drilling because chips must travel through the hole and out of the cutting zone. Poor chip evacuation can reduce hole quality and contribute to tool breakage or component damage.
Possible causes:
-
Insufficient coolant flow
-
Incorrect feed or cutting speed
-
Wrong insert geometry
-
Chips are too long
-
Deep-hole application without suitable tooling
-
Blocked coolant passages
How to solve it:
-
Check coolant flow and pressure
-
Use a suitable chipbreaker or insert geometry
-
Optimize feed and cutting speed
-
Keep coolant directed toward the cutting zone
-
Clean blocked coolant passages
-
Use a drill designed for the required hole depth
3. Excessive U-Drill Vibration
Vibration can cause poor hole quality, insert chipping, unusual noise, and inconsistent tool life.
Common causes:
-
Excessive tool overhang
-
Poor workpiece clamping
-
Toolholder runout
-
Machine instability
-
Incorrect cutting parameters
-
Uneven or interrupted entry conditions
How to solve it:
-
Keep tool projection as short as practical
-
Check toolholder and spindle condition
-
Improve workholding
-
Reduce cutting load when necessary
-
Verify drill alignment
-
Use tooling suitable for the machine and application
A rigid tool assembly and stable machine setup are important for controlling vibration during machining.
4. Hole Diameter Is Oversize or Undersize
A U-drill may produce a hole outside the required tolerance even when the programmed diameter is correct.
Possible causes:
-
Tool runout
-
Incorrect insert positioning
-
Worn insert
-
Incorrect drill geometry
-
Excessive cutting forces
-
Unstable workpiece
-
Incorrect cutting conditions
How to solve it:
Check spindle and toolholder runout first. Then inspect the inserts and pockets, verify the correct drill diameter, and confirm that the cutting conditions are suitable for the material.
For precision holes, measure the first component and make controlled corrections rather than changing several variables simultaneously.
5. Uneven Insert Wear
The center and peripheral inserts of a U-drill do not necessarily experience identical cutting conditions. Uneven wear can indicate incorrect cutting conditions, runout, coolant problems, or an unsuitable insert grade.
Check for:
-
Different wear patterns between inserts
-
Chipping at the outer cutting edge
-
Excessive wear near the center
-
Built-up material
-
Thermal damage
How to solve it:
-
Check insert seating
-
Verify drill runout
-
Confirm the correct insert grade
-
Inspect coolant delivery
-
Review cutting speed and feed
-
Replace damaged inserts before they affect the drill body
6. Excessive Heat
High cutting temperatures can accelerate insert wear and contribute to poor tool life.
Common causes:
-
Excessive cutting speed
-
Insufficient coolant
-
Poor chip evacuation
-
Worn inserts
-
Incorrect cutting geometry
-
Excessive cutting load
How to solve it:
-
Check the recommended cutting speed
-
Ensure sufficient coolant reaches the cutting zone
-
Improve chip evacuation
-
Replace worn inserts
-
Check the insert grade and geometry
Coolant directed toward the cutting zone can help control heat and improve chip evacuation.
7. Poor Surface Finish Inside the Hole
A rough internal hole surface can indicate unstable cutting or poor chip evacuation.
Possible causes:
-
Worn or chipped inserts
-
Long chips rubbing against the hole wall
-
Vibration
-
Incorrect feed
-
Tool runout
-
Insufficient coolant
How to solve it:
Inspect the chips and insert edges first. Then check runout, coolant delivery, feed rate, and tool stability. Good chip formation and evacuation are essential for consistent hole quality.
8. U-Drill Produces Long, Tangled Chips
Long chips can wrap around the tool or workpiece and may interfere with safe machining.
Possible causes:
-
Incorrect insert geometry
-
Low or unsuitable cutting speed
-
Incorrect feed
-
Poor chipbreaker selection
-
Inadequate coolant
How to solve it:
Use an insert geometry suitable for the workpiece material and application. Adjust cutting parameters within the manufacturer’s recommended range and improve coolant delivery. Changes in cutting speed or geometry can sometimes help produce shorter, more manageable chips.
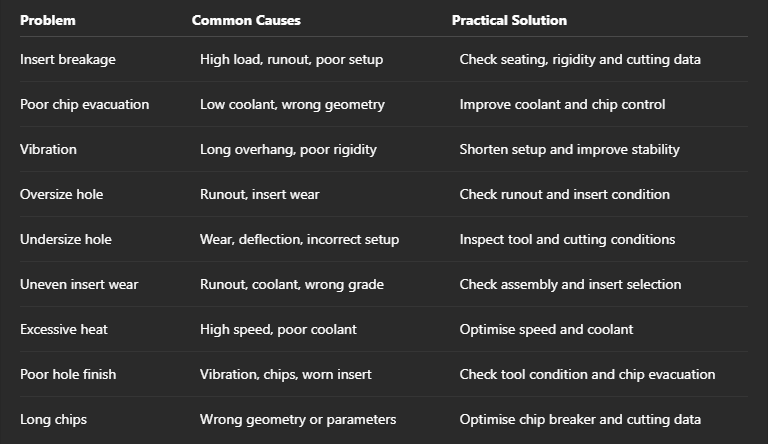
U-Drill Troubleshooting Table
A Simple U-Drill Troubleshooting Sequence
When a U-drill starts producing poor results, avoid changing several parameters at once.
1. Check the Inserts
Look for wear, chipping, built-up material, and incorrect seating.
2. Check Runout
Inspect the toolholder, drill body, and spindle interface.
3. Check Coolant
Confirm that coolant reaches the cutting zone with sufficient flow and pressure.
4. Check the Chips
Look for short, controlled chips rather than long or tightly packed chips.
5. Check Cutting Data
Review cutting speed, feed, and drilling depth against the tool manufacturer’s recommendations.
6. Check the Setup
Verify workholding, tool projection, alignment, and machine rigidity.
Making one controlled adjustment at a time makes it easier to identify the actual source of the problem.
Why Choose MakeYouEasy?
MakeYouEasy helps simplify CNC tooling procurement by bringing drilling tools, carbide inserts, milling tools, turning inserts, tool holders, and machining accessories together in one place.
For U-drilling applications, selecting the correct drill body, insert geometry, grade, diameter, and compatible tooling is important for achieving reliable hole-making performance.
Conclusion
U-drill problems are often connected to a combination of insert condition, cutting parameters, chip evacuation, coolant, tool runout, and setup rigidity. Insert breakage, vibration, poor hole accuracy, excessive wear, overheating, and long chips should be treated as troubleshooting signals rather than isolated problems.
Start by checking the tool and setup, then inspect coolant and chip formation before adjusting cutting parameters. A systematic approach can help improve U-drill tool life, hole quality, process stability, and machining productivity.
Frequently Asked Questions
1. Why does a U-drill insert break?
High cutting loads, runout, poor insert seating, vibration, incorrect cutting parameters, or poor chip evacuation can cause insert breakage.
2. How can I improve U-drill chip evacuation?
Check coolant flow, use suitable insert geometry, optimize cutting parameters, and ensure the drill is appropriate for the hole depth.
3. Why does my U-drill produce an oversized hole?
Tool runout, insert wear, incorrect insert positioning, deflection, or unstable cutting conditions can contribute to oversized holes.
4. How can I reduce U-drill vibration?
Reduce tool overhang, improve workholding and toolholding rigidity, and verify alignment and cutting parameters.
5. What should I check first when a U-drill problem occurs?
Start by checking insert condition and seating, tool runout, coolant delivery, chip formation, and the recommended cutting parameters.
Popular Search Keywords
U-drill problems, U-drill troubleshooting, U-drill problems and solutions, CNC U-drill, indexable drill problems, U-drill insert breakage, U-drill chip evacuation, U-drill vibration, U-drill hole accuracy, U-drill insert wear, CNC drilling problems, and U-drill cutting parameters
